Lightroom Classic Tip: Master the Tone Curve for Perfect Exposure
Introduction
Adobe Lightroom Classic is a powerhouse for photographers, offering precise control over every aspect of your images. One tool that often gets overlooked—but can dramatically improve your photos—is the Tone Curve. Today, we’ll dive into how you can use it to enhance contrast, adjust brightness, and add creative flair to your shots.
What is the Tone Curve?
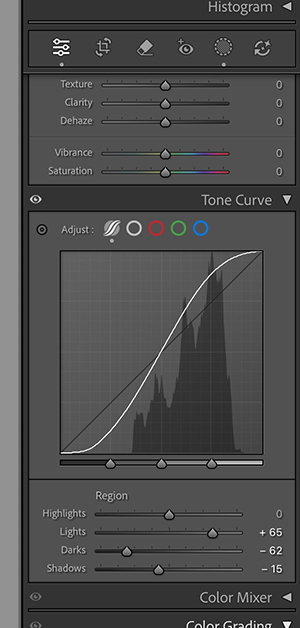
The Tone Curve is a graph that represents the tonal range of your photo—from shadows (left) to highlights (right). By adjusting the curve, you can fine-tune brightness and contrast with greater precision than sliders alone.
- Shadows – The darkest parts of your photo
- Darks – Dark areas but not fully black
- Lights – Lighter areas
- Highlights – The brightest parts of your image
Step-by-Step Tip: Boost Contrast With an S-Curve
- Open Lightroom Classic and select your image.
- Go to the Develop module.
- Locate the Tone Curve panel.
- Click the Point Curve icon to manually adjust the curve.
- Create a subtle S-shape:
- Drag the lower portion slightly downward to deepen shadows.
- Lift the upper portion slightly to brighten highlights.
- Fine-tune by adjusting midtones if needed.
This simple S-curve adjustment adds depth and contrast, making your images pop without losing detail.
Pro Tip: Target Specific Tones
- Highlights only: Use the curve’s top-right region to brighten skies or light areas.
- Shadows only: Adjust the bottom-left region to recover detail in dark areas.
- Color adjustment: Switch to Red, Green, or Blue channels to tweak color tones creatively.
Why This Matters
Mastering the Tone Curve gives you professional-level control over exposure and contrast, far beyond the basic sliders. It’s ideal for:
- Landscapes: Enhance depth in skies and foliage
- Portraits: Subtle adjustments for natural skin tones
- Black & White: Dramatic contrast and tonal balance